Well, after not posting for quite a while, I'm going to double up and post 2 machines within one day!
Today we have an 1879 Davis LAVF in a very special Style 9 cabinet. The machine has a serial number of 125561. I spotted this machine/cabinet over a year ago. It was list on FB market place in northern New Jersey. When I saw it, I immediately knew I had to try to get it. I contacted the seller very quickly and they responded very quickly. It was interesting, because when I asked the seller what time I could arrive to pick up the machine, he said that he was and early riser and I could come at any time. That got me thinking.....I could drive the 6+ hours though the night and be there bright and early in the morning to pick up the machine. I asked him "How early is early"? He said, "Any time is fine, even before 5am if you wish." This was great news! I could get in and out before the northern NJ/NY traffic got heavy. So my wife and I jumped in the car at 10pm and drove all night. We arrived around 4:30am and it was great because nobody was on the road! Sure enough he was up and waiting for me. He said it had belonged to his Aunt and had been left to him but he didn't have much other historical information on it. His home was dimly lit and after all, it was 4:30am so getting a detailed look at the cabinet and machine wasn't really feasible. I knew I wanted it and I wasn't not going to buy it after driving 6 1/2 hours. So, I handed him the money and he helped me load the machine into the car. The whole transaction probably took 10 minute., Then my wife and I drove immediately back home (another 6 1/2 hours). Below are pictures directly after we arrived home.


 |
| Note the red finish is even on the bobbin winder tire! |


After getting the machine/cabinet home, I could now get a really good look at things. It was immediately obvious that the cabinet had been refinished previously with some sort of red waxy type of product (probably similar to Briwax). Both sides of the cabinet had burl veneer damage and the bottom of both front doors also had some burl veneer damage. The drawers were all missing their pulls,but at least all of the drawers were there. Surprisingly, the drawers were a yellowish maple color. But, overall, the cabinet was basically complete and restorable. The machine was in pretty good shape and the decals were mostly present yet somewhat fragile. The stitch length adjustment knob was in one of the drawers but the adjustment mechanism was actually broken inside of the head. Based on all of this, it was obvious that I had quite a lot of work ahead of me.....but I love this stuff!! Time to get to work!
The first thing I did was start looking for the stitch length parts for the machine. After some quick searches on the internet, I didn't see what I needed. So I messaged the late Jon Helig who was very knowledgable about Davis sewing machines. Sure enough, Jon had the parts I needed! We quickly struck a deal and he shipped the parts to me. Speaking of Jon.....I never met Jon in person but I had dealt with him many times for sewing machine parts, needles, research, etc. Everytime we spoke, he was very nice. He was an expert regarding vintage sewing machines and was willing to share his knowledge with everyone. I think I can speak for my fellow sewing machine enthusiast friends that we were extremely saddened by his passing. The sewing machine community definitely misses Jon.
The next thing to tackle was the cabinet. Given the previous refinish, it was obvious I was going to need to strip the finish off of the cabinet and refinish it. First, I disassembled the cabinet, then proceeded to strip the finish.
The picture below shows the red finish before stripping (top door) and the wood finish after stripping (bottom door). The bottom door was coated in mineral spirits to simulate a clear finish. You can see that the wood has a browner look as opposed to a red look.
The picture below shows both doors stripped and the cabinet side stripped (all coated with mineral spirits). As you can see, removing the red finish revealed a light veneer color on the doors and the lid. Note the broken burl veneer.
At this point I had to make a decision on how to fix the veneer. Do I try to patch the burl veneer or replace entire sections of the burl veneer? Since the cabinet sides had significant veneer loss I decided to replace the entire triangular sections. Below are some pics of that process. Hide glue was used to secure the burl veneer to the sides and the burl veneer color matched using walnut tinted shellac.


After I replaced the burl veneer on the sides, I put things on the back burner for quite a while (months in fact). I had other projects that jumped the line and I was still torn on whether or not to patch the veneer on the front door or completely replace the damaged veneer. Time passed and I finally got the bug again to finish the project, so I made a decision to try to patch the veneer. After all, if it didn't work out I could always replace the entire piece. Below are some pictures of the door veneer patching results.
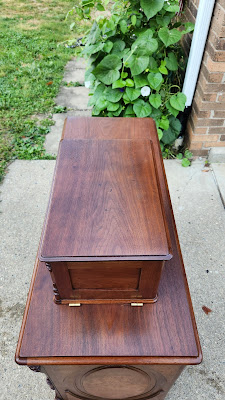
Next I sprayed all of the parts with a some walnut dye to color match the different pieces of the cabinet. Then I assembled the cabinet and sprayed final finish coats of clear varnish smoothing the finish with 0000 steel wool between coats. Below are the pics of the results after drying.
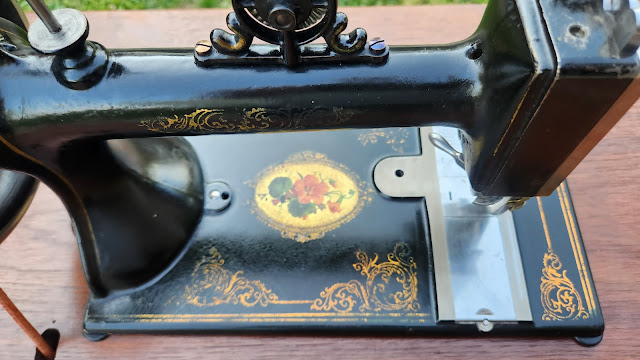
The treadle wheel, skirt guard, treadle pedal, and bobbin winder were all cleaned and polished. I was really please with how much gold decoration was still remaining on the skirt guard and treadle wheel. As expected, the treadle pedal saw the most loss in decoration due to foot wear. I decided to use a white bobbin winder tire as that is what would have originally come with the machine. I did dye the white tire a bit to make it look a little aged and not so stark white.
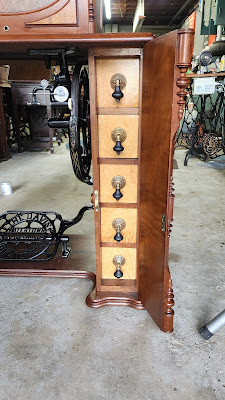
The drawers didn't need much cleaning up but as mentioned earlier they were all missing their drawer pulls. To this day, I haven't seen pictures of another Davis Style 9 cabinet. The only reference I had was this illustration of a Style 9 cabinet which clearly shows that they had eastlake style tear drop drawer pulls. After searching for quite a while for antique ones that were small enought to fit correctly, I decided to buy after market drawer pulls and then antique them a bit.
The machine was cleaned using my normal methods although the metal parts didn't need much cleaning so I decided to not completely disassemble the machine. I also didn't overly clean or polish the metal parts.


Below are pictures of the final results. The pictures were take in the shade so the cabinet looks a tad darker than it really is. This was a project that challenged my wood finishing skills (especially my veneering skills). I'm overall pleased with the results and I'm proud to have been provided with the opportunity to preserve this wonderful sewing machine.


.jpg)


Comments
Post a Comment