It's been a while since I posted to my blog and the machine I'm going to write about in this post is one of the reasons why. I have been wanting a vintage embroidery machine for quite a while. They are not easy to find and when you do find one they are usually very expensive ($1500 - $4000). I was introduced to embroidery machines when my wife and I visited a fellow sewing machine collector. She had many beautiful domestic sewing machines but she also restores embroidery machines. While we were there she gave us the opportunity to try one of her Cornelly embroidery machines. It was so much fun to sew with and I was amazed at what you can do with these machines. From that point, I've been looking for a vintage embroidery machine that I could afford.
Normally when I restore sewing machines I used a buffer to clean and polish parts. That is not what I did here. My main goal was to make this machine functional. I did clean the machine but not to the extent that I normally do. I might decide to do that in the future but probably not until I learn to use the machine and have some fun with it.
One day in early April I was search Facebook Marketplace and I spotted a Singer 114w103. The ad was for the head only but the price was so low it was almost too good to be true. The machine didn't look to be in good shape but I wasn't phased by the condition. Hey, that's what I do! I immediately contacted the seller and warn my wife that I might be making a sudden road trip. The seller responded fairly quickly and I agreed to buy the machine for the asking price. This was the only picture from the ad.

I quickly headed out the door to the Canton, OH area. This was about 6pm in the evening so I wouldn't get to the seller house until about 8pm. When I got there it was already dark. The seller's son was sitting on the front porch with the lights out. There were street lights but it was still pretty dark. The seller's son and I both fired up the flashlights on our cell phones so I could see the machine. Yup! It was a 114w103! I asked him where they got the machine from and he told me it was in a storage locker that they had bought in an auction. Not much more conversation took place. I handed him the money and I was outta there! Very excited, I made my way home. I stopped for gas and took this picture at the gas station.

Not knowing much about these machines I didn't really know what to look for when I picked it up. Plus, it was dark. After I got it home, I started to inspect the machine and realized that it was missing parts. My immediate thought was "oh no, did I just drive 4 hours to buy a giant paper weight"? At least the price was right and I knew I could part it out and make money. But that's not what I wanted to do.....I wanted to make it sew! The next thing I did was to make an inventory of the parts that I would need to make it sew. I created a list of more than 30 items that would be need to make it sew. Most were minor things such as needles, springs, nipples, etc. But there were some major things.....needle plate and mounting screw, presser foot bell crank, newer style tension assembly, presser feet, etc. Now for the fun task of trying to find these parts without breaking the bank!
I started doing my research on finding parts. As I mentioned earlier, parts for these machines can be really expensive. Most of the internet searches for parts confirm this. So, I started contacting people I know in the sewing machine world but all of them didn't have what I needed. I saw there were a few chainstitch embroidery sewing machine groups on facebook. I submitted request to join two of them. The one was a group created by a person who sells new machines that are copies of the 114w103 machines......they rejected my request as I didn't buy a machine from them. I guess the group was only for their customers. The second group accepted my request. I posted the above pic of my find and asked where I might be able to find parts. Several members responded to my post and had suggestions. One in particular, Holly Moore, suggested that I contact a company over in India. The reproduce the 114w103 and sold individual parts at a very resonable price. I sent them a list of what I needed and they put together an invoice for me with prices for everything. There was quite a bit of back and forth them making sure we were on the same page but in the end it worked out well. I basically bought all of the parts I needed and it cost about the same as buying one original part.
While I waited for my parts to arrive in the US, I started cleaning the machine. I removed the face of the machine because the presser foot bar and nipple would not move at all. I tried just lubricating the parts but that wasn't working. I then disassembled the face which wasn't an easy task. This thing was really gummed up with old oil and dirt. Below are some of the pics of the gunk that had the face all glued together.


After I removed the face of the machine submerged the face of the machine in a tub of straight Krud Kutter. It took a while for it to loosen the dried up oil/dirt and it took a good bit of scrubbing but it all cleaned up pretty nicely. I usually use a buffer to polish things up a bit but this time I decided to leave the machine with some patina. Another reason why the nipple wouldn't budge was that the upper tube was bent out of round a bit. It took me quite a bit of massaging to get the tube back to round so it would slide up and down in the face. Below are some pics of the cleaned up face.


Next I started to fit the new presser foot bell crank, eccentric pin, and pin set screw. The the bell crank fit pretty well but had to be modified to work properly. It had to be ground down in two spots indicated by the red and green arrows in the picture below. I was worried that the set screw that Mauzer sent me would be a different thread that Singer used but I was pleasantly surprised that the Mauzer set screw was the same thread size as the Singer!
Another challenge that I faced with this machine was that the presser foot lever screw hole was completely out of round and only a few threads remained in the hole. I thought of several different ways to correct this, the most permanent way being to drill the hole out and install a heli coil. But then there is the issue that Singer used odd thread sizes and finding a heli coil the right size would be next to impossible. What I ulitmately ended up doing was coiling up copper flashing and inserting it into the hole. Then I threaded the screw into the copper flashing which then conforms to the threads of both the hole and the screw. I don't think it will last forever but it works!! See pics below.
Once I got the face cleaned up and moving I was able to direct my attention to cleaning the rest of the moving parts in the machine. See pictures below.


Next I upgraded the older tension assembly to a newer style assembly that I bought from Mauzer. This was an easy swap that only comprised of removing the two screws that hold on the assemble and then bolt on the new assembly. It's a direct swap.
Now that I had the machine mechanically cleaned up it was time to see if this machine would make stitches! To do that, I needed to make some kind of stand so that I could simulate it being in a table. I could have just made a table but I didn't want to invest in a table, servo motor, etc. if the machine wasn't going to work. I started digging through some of the junk I save and I found this entertainment center VCR holder. I just flipped it over and cut out the opening for the machine. This would allow me to at least turn the machine over by hand and access the bottom of the machine for threading and turning the handle.


There were still two more things that I needed to do before trying to make stitches. First, I had to time the machine. I seriously suggest watching Holley Moore's video's on timing. You can check them out at https://www.youtube.com/@ChainStitchEmbroidery . After watching her videos I was able to quickly and accurately time the machine. Second, I had to fit Mauzer supplied presser foot and presser foot clamp. Both parts had to be modified to fit my machine. The presser foot shaft had to be shortened and thinned. It also had to be straightened so that all the teeth would hit the needle plate at the same time. The end of the presser foot clamp also had to be thinned so that it wouldn't hit the nipple tube.
Now it was time to see if the machine would make stitches. I threaded the machine and lowered set the needle bar height. I lowered the needle and low and behold it picked up the thread! I got a blue shop towel to serve as fabric and turn the machine over by hand. To my surprise it made stitches! Below are the machines first stitches after it's resurrection. They are a bit loopy and inconsistent but not too bad!

Now it was time to fine tune the stitches. But to do that you need to apply power to the machine so that you can consistently turn the machine over. So now it was time to make a table for the machine.
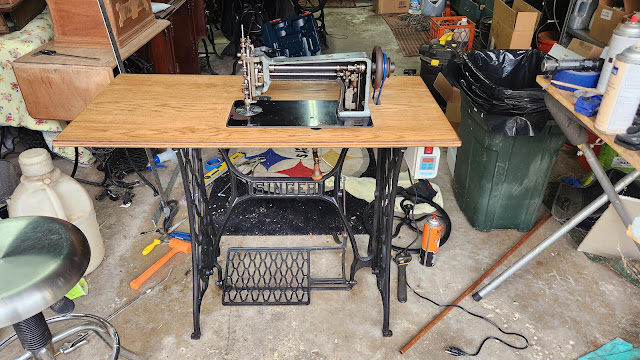
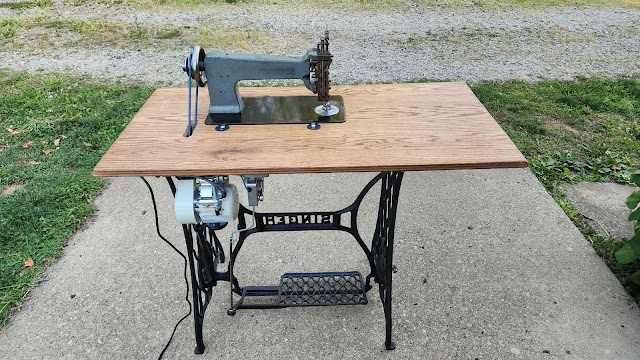
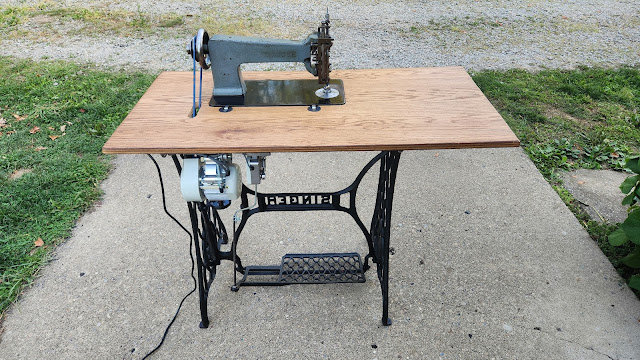
I did some research on 114w103 tables. I was hoping that another machine had the same footprint as the 114w103 but I couldn't find any. So then researched aftermarket tables and they can tend to be pricey. A table top alone will cost you upwards of $300. I had watched Holly Moore's videos on how to make tables out of treadle irons so I decided to do that. I have a few old irons laying around but right at this time I saw an ad for a set of industrial irons for sale at a reasonable price. The seller had made a table out of the irons so I took the table top that he made (it's just plywood) and made it back into a sewing machine table. I basically followed Holly's instructions except I didn't have to stretch the treadle base as the industrial base is wider than a domestic treadle base. I wanted to sink the machine into the table so I decided to buy a router to handle that task. I had always wanted a router so I used this as an excuse to buy one. I won't go into detail on how to make the table since it's all covered in Holly's videos. I bought a server motor and mounted that under the table to drive the machine. Below are pics of the table. The first pics is how I bought the table. The other pics are during and after the transformation of the table.

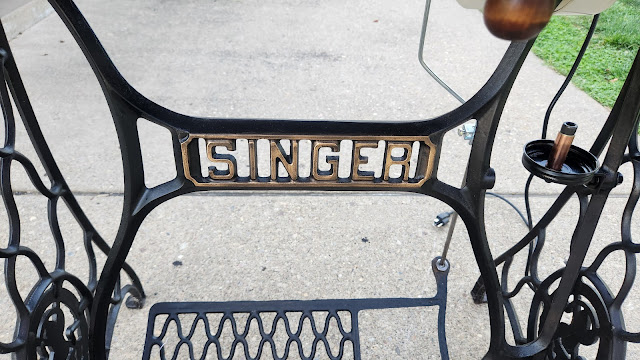
Once the table was all together I decided to highlight the Singer logos with some gold Rub-N-Buff. I like using this product because it's super fast and I can easily make it look like it's not brand new (like paint would).
All in all, I think it came out. Now that it's functional and I'm having fun sewing with it, I decided to invest in some thread......ok, a lot of thread!!
Thanks to Holly Moore for her guidance and patience with me throughout this whole project. I couldn't have done it with out her help! Also, thanks to Abdul from Mauzer for all of the parts to make this machine functional again and for patience with me while I selected colors of thread. Also, I would encourage anyone who is wanting to know more about these machines to join the FB group "Chainstitch Embroidery Machines Singer 114w103 Cornely and more". There are a lot of really nice, knowledgable people who are very willing to help newbies like me!
Below are pics of the final results of the machine/table. This was a fun project and I learned a lot in the process of bringing this machine back to life.
Below are some videos of the machine in action.


Comments
Post a Comment